Baking Polymer Clay Perfectly Every Time
Here's an easy baking polymer clay chart where you can look up bake times and oven temperatures by brand if you're in a rush. The rest of this article contains in-depth answers to common questions about polymer clay baking problems and methods for cooking beads safely and beautifully.
To bake polymer clay, preheat your oven to the manufacturer’s advised temperature (usually 230°F - 275°F). Baking times are typically 15 - 30 minutes for each ¼ inch thickness. Thinner clay needs 15 minutes to cure. When cool, properly baked clay can be marked with a fingernail, but it won’t sink in.
It sounds simple, but baking to harden polymer clay can be the most frustrating part of clay crafts. Don’t worry; you CAN cure polyclay with confidence if you take a few easy precautions. And you’ll have a project to show off proudly every time!
You Only Have to Control 3 Things When You're Baking Polymer Clay
Temperature, Time, and Baking Surfaces
Manage these and your oven will produce perfectly cured projects
without scorching, burning or brittleness.
If you overcook your clay the only way to fix it is to cover it up or sand it off. You can hide browning by adding another layer and rebaking or painting over it. Be warned, sometimes sanding doesn't work because the scorch can go all the way through. So getting baking right the first time is important.
So what are the 6 most important questions about baking polymer clay?
- Do you have to bake it?
- How do you find the correct oven temperature?
- How can you tell when it's done?
- How long do you bake it?
- What's the best method for baking beads?
- Baking on glass - Is it best? How to do it?
Plus 2 Bonus Questions!
#1: Do You Have to Bake Polymer Clay?
No. There is polymer air dry clay that dries at room temperature, but it has a limited working time. And that makes certain techniques impossible, like creating canes that have spreadable slices.
Most polymer ‘oven clay’ hardens and cures with sufficient heat for a long enough time. There’s no shortage of crazy ways to cook clay. It’s been hardened with heat guns, cooked in electric roasters, tossed in fry pans on a bed of plaster of paris powder, boiled, fried, and even microwaved. DON’T try to cure your polymer piece by just sticking it in a microwave! What these crazy experimenters did was cover the polyclay with plenty of water and essentially boiled the water in the microwave.
Baking polymer clay isn't the only way, but it is the easiest and gives you control over the most important variables.
#2: How Do You Find the Correct Temperature?
As Albert might say about baking polymer clay, ‘It ain’t rocket science kiddo!’ Read the directions on the package. They will tell you the right temperature to use and how long to cook it. There are three exceptions:
- Are your translucent or light colored clays yellowing or scorching? Put some glazed ceramic tiles into your oven before baking. Pre-heat for at least 15 minutes to get them hot. Place your pieces (and their holder like a cookie sheet) on top of the ceramic tiles when baking. They will hold heat and even out the oven's temperature after you open the door to put in your pieces.
- Get a GOOD separate thermometer (or two) and watch that oven temperature like a hawk. At some point it is getting too high and slightly burning or browning the clay. Your oven could also be 'spiking' (keep reading down this list for more info on this).
- Try dunking your piece into ice water immediately after taking it out of the oven. This halts any additional curing from residual internal heat that may push the translucent over the edge from cured to yellowed. Do NOT do this if you have inclusions that may absorb water or if your piece is built upon a porous armature. Watch out for paper, cardboard or wood.
- Reduce the oven’s temperature by 10 degrees C (18 F degrees) and double the cooking time. Bake a testing sample and do a breakage test (see the Test Baking box below)
- Keep your pieces as far away from the heating elements as possible. Consider curing your pieces in your larger home oven inside an oven baking bag.
- High elevation baking If you are located at high altitudes (above 3,500 feet) You’ll need higher temperatures and a bit more time, just as if you were baking a cake. Add 5 degrees to the recommended temperature, and 10 extra minutes. If in doubt, test a sample.
- Your oven temperature 'spikes' Some ovens are manufactured with a built in quick heating cycle and use a higher temp than the dial setting in order to bring the average internal temperature up faster after the door is opened. Unfortunately this can scorch translucent or thin pieces when you're baking polymer clay. If you find that you are burning projects even if you're using a good thermometer, this might be the problem. Here's what to do. Place ceramic tiles into your oven to bake on. Then preheat your oven to about 20 degrees below the manufacturer's recommended temperature. Then place your piece in the oven for 10 minutes. After the ten mins are up, set the dial to the correct temp. Start your stopwatch and then bake for the normal time.
#3: How Do You Know When Polymer Is Done Baking?
When polyclay is cured correctly, your cooled piece can be marked when you press a fingernail into it, but your nail won't sink in. It will be difficult to break, but if it is thin it might bend easily. It will break or cut cleanly, without a crumbly texture.
Of course the first hint that you're finished baking polymer clay is when your kitchen timer dings. But it won't feel done. Polymer is quite soft when first removed from the oven. It needs to be cooled completely to reach its final hardness.
Test Baking
Roll a bit of your clay mixture to the same thickness as the piece that you're baking. Bake your sample.
Cut or break when completely cool to examine the interior for crumbling or brittleness.
#4: How Long Do You Bake Polymer Clay?
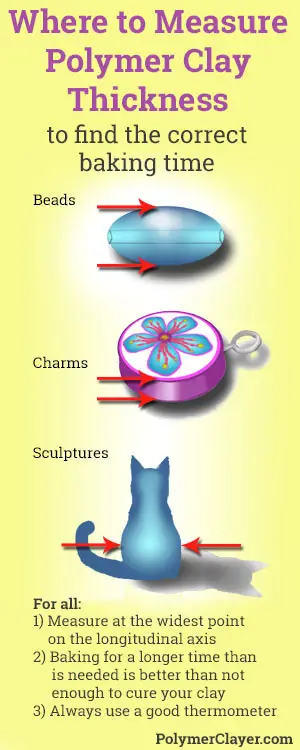
Check the packaging for basic instructions. Then ask yourself, "How deep is the thickest layer of unbaked clay?"
The duration of your baking time depends upon the depth of the raw polyclay layer. If it’s a bead, measure the distance from the center to the surface.
If you've lost the package, but remember the brand, you can look up the correct temperature and cooking times in the chart below. It includes Fimo baking instructions and also applies to baking Sculpey in a toaster oven.
In the chart, oven baking times that have been taken directly off the manufacturer's package are written in black type. Others are written thusly: **for every 1/4 inch (6mm) thickness**. The orange type is an estimate for those manufacturers that do not give explicit baking instructions for thicker layers. These companies print something nebulous about baking their polymer longer for thicker layers.
The general claying community consensus is to treat 1/4 inch (6mm) as the 'standard' thickness and then add on that brand's standard baking time unit for every multiple of the standard. It is recommended that you bake a test sample first so you don't burn or under cook your piece. And...
NEVER leave your oven unattended when baking clay!
Polymer Clay Baking Instructions by Brand Name Chart
|
Clay Brand
|
Temperature
|
Oven Time
|
|
Cernit
|
265°F (130°C)
|
30 minutes for every 1/4 in (6mm) thickness
|
|
Clayzee
|
248-302°F (120-150°C)
|
15 minutes **for every 1/4 inch (6mm)**
|
|
Du-Kit
|
250°F (120°C)
|
10 minutes **for every 1/4 in (6mm) thickness**
|
|
Fimo clay
|
230°F (110°C)
|
30 minutes **for every 1/4 inch (6mm) thickness**
|
|
Fimo Liquid
|
265°F (130°C)
|
20 minutes
|
|
Fimo Liquid with Fimo clay
|
265°F (130°C)
|
30 minutes
|
|
Granitex
|
275°F (130°C)
|
15 minutes for every 1/4 in (6mm) thickness
|
|
Kato Polyclay
|
275°F (135°C)
|
30 minutes **for every 1/4 in (6mm) thickness**
|
|
Kato Liquid Polyclay - Matte finish
|
300°F (150°C)
|
20 minutes
|
|
Kato Liquid Polyclay - Glossy finish
|
350°F (177°C)
|
30 minutes
|
|
Pluffy
|
275°F (130°C)
|
15 minutes for every 1/4 inch (6mm) thickness
|
|
Premo
|
275°F (130°C)
|
30 minutes for every 1/4 inch (6mm)
|
|
Sculpey III
|
275°F (130°C)
|
15 minutes for every 1/4 inch (6mm) thickness
|
|
Sculpey - Original
|
275°F (130°C)
|
15 minutes for every 1/4 inch (6mm) thickness
|
|
Souffle by Sculpey
|
275°F (130°C)
|
30 minutes for every 1/4 inch (6mm) thickness
|
|
Translucent Liquid Sculpey - when applied to solid clay
|
275°F (130°C)
|
15 to 20 minutes
|
|
Translucent Liquid Sculpey - by itself for Glossy finish
|
300°F (149°C)
|
15 to 20 minutes
|
#5: What Is The Best Method for Baking Polymer Clay Beads?
This material softens a bit in the oven before the polymerization process is complete. This can cause flat, shiny spots if you're baking on a hard surface. To keep the shape that you want, you need to rest your beads on a surface that conforms to the bead or support it without resting it on a flat surface.
Many people use bead baking trays like this AMACO Bead Baking Rack.
I like these beading racks because they fit easily into a standard toaster oven. They come with thick wire bead supports that also work well for making holes to thread beading wire through.
Alternate support methods for baking polymer projects are:
 Put them in a poly fiber fill 'cloud'. |
 Lay them in a bowl filled with baking soda and partially cover them. After baking, clean with running water. |
 Rest the beads on paper 'troughs' folded from white, matte finish cardstock |
(Just in case you're wondering, my little pink dragon was made by the talented Kathy Davis.)
#6: Should You Be Baking Polymer Clay on Glass or Porcelain, or Ceramic Tile?
Many people pre-heat a glazed (not terra cotta) tile and then transfer their creation on to it for baking using a sheet of ordinary white paper or matt finish cardstock like the back of an index card.
This does three things:
- The tile holds the heat, evening out the fluctuation caused by you opening the oven door. This is especially important if you're baking in a smaller toaster oven.
- It prevents the shiny finish that will occur if you bake directly on the tile.
- It keeps your piece flat while curing.
|
|
|
PolymerClayer › Baking Polymer Clay


