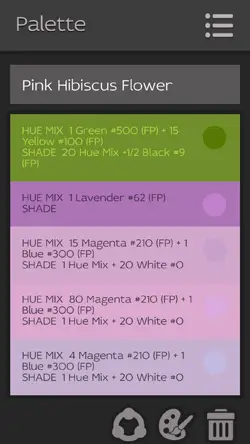
How You Put Together ColorMixr™ Recipes from the My Palettes Library

ColorMixr™ helps you find the polymer clay color mixes that you want in second, rather than days. But how do you read the Fimo and Premo! Sculpey recipes? Here's a short guide.
And if you have other questions you can get them answered in the User Guide/FAQ.
How do you assemble color recipes?
What's a HUE MIX and a SHADE?
Abbreviations you need to know:

- (FP) - Fimo Professional
- (FE) - Fimo Effects
- (PS) - Premo! Sculpey
- (PA) - Premo! Accents
Color blending is a two stage process that I quite frankly swiped from the Fimo Professional directions.
First, you blend the HUE MIX. Then, you tone the HUE MIX by adding either black or white.
STEP #1: Make the HUE MIX:
- Roll out Fimo or Premo! Sculpey sheets of equal thickness on your pasta machine for each color of clay in the ColorMixr™ recipe.
- Cut out the required number of units in each color to make the HUE MIX. Use the the same cutter for all colors! (see video below)
- Mix the clay color cutouts together thoroughly to create the HUE MIX.
- Put the HUE MIX through the pasta machine at the same thickness that you are using for the black or white sheets.
- Use the shape cutter to cut out the number of HUE MIX units that you need for the final recipe result
STEP #2: Make the SHADE:
- Sheet out black or white polymer clay at the same thickness that you used when you cut out your HUE MIX units.
- Use the same shape cutter to cut out the number of black or white clay units required for the final SHADE instruction.
- Blend the HUE MIX units together with the black or white units.
Congratulations. You've mixed your first ColorMixr polymer clay color recipe.
Save your palette by going back up to the Menu Icon in the upper right hand side of the screen.
If you're into video instruction, Staedtler posted a terrific video explaining the process on YouTube.
|
|
|
Put your question right here!
Or tell us how we can help you...
Polymer Clay Home Page › ColorMixr User Guide › Putting Recipes Together


